Introduction #

The Controleo3 is a DIY reflow oven kit made & sold by Whizoo. It allows anyone to transform a toaster oven into a reflow oven, with a standard kit containing a thermocouple, three solid-state relays, a touch screen controller, insulation, and all the assorted bits that are required to wire it all together. The kit does not include a toaster oven but the build guide is written around the Black & Decker TO1303SB. The Controleo3 is similar to a product like the Chinese-made T962 reflow oven except it does not use infrared heating elements & has a far better user interface.
During my initial attempt at building one, I ended up damaging the top heating element and having to replace it. This post aims to provide some guidance for people who may find themselves in the same situation.
My mistake #
In step 9 of the build guide the oven is fitted with Floor & Tunnel Shield II - an adhesive backed heat barrier that helps keep the generated heat from escaping out of the top, rear, & bottom metal panels of the oven. The adhesive used is some of the strongest I’ve ever dealt with and once placed becomes very difficult to move. When placing the top piece of shielding, I made the mistake of fully exposing the adhesive side before moving the shield into place and promptly got stuck with the shield sticking partially out the front of the oven. While trying to pull it back out, I pulled on the top element - bending the metal cage surrounding it and shattering the quartz piece that surrounds the resistive heating coil.
The repair #
After cursing & panicking that I may have just cost myself some time & money with my mistake, I reached out to Whizoo to see if they recommended completely starting over or just buying a second oven to poach a new element from. They recommended the latter so I ran out to Big Lots & picked up a new oven.
New Costs #
To do the repair, you will need the following items, with approximate costs as of August 2020. The silicone gasket remover may not be entirely necessary, but I thought it was worthwhile to have. If you do not have any Hi-Temp RTV from the earlier assembly, you will also need to buy a new tube of it.
| Qty | Item | Cost (USD, 2020) |
|---|---|---|
| 1 | Black & Decker TO1303SB | $30 |
| 1 | Ford ZC-30-A Silicone Gasket Remover | $13 |
| 1 | Butt splice | $0.10 |
##Repair process
- Spray the ends of the top element with the silicone gasket remover. Allow it to sit
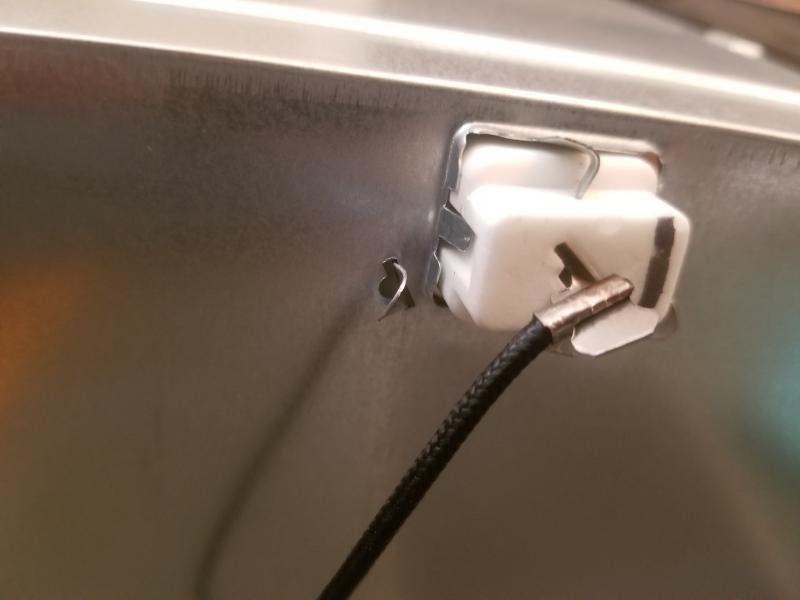
and then start peeling off the old gasket with pliers. - Once the gasket is mostly removed you will see that the end of the element has four
bent pieces of metal to keep the element from moving inwards or outwards. Use your pliers
to bend these pieces away from the element but be careful not to rip them off. You will
need them for your new element.
- Cut the return wire for the top element (that goes to the bottom element) at the midpoint.
- Pull the element through the oven wall on the opposite side of the controller. The
hole that holds the element on the controller side is smaller so it is only possible
to take the element out in this direction without cutting more of the oven. - (Optional) If you damaged the top element guard badly, you can replace it as well.
Straighten the pieces that protrude through the wall and then push on the inside of the
oven wall to flex the wall outwards and give room for the shield to be loosened. - Repeat steps 2-4 on the new (donor) oven. When cutting the wires to free the top element,
maximize the length of wire attached to the element if you are doing only a top replacement.
If you want to upgrade your boost element, cut the return wire between the top & bottom elements
at the midpoint. - Take your new element and slide it into the recipient oven on the side opposite the
controller. Bend the metal pieces back into place as best you can to retain the new element. - (Optional) Install the new guard in the same manner as you removed it in step #4.
- Re-seal both ends of the element.
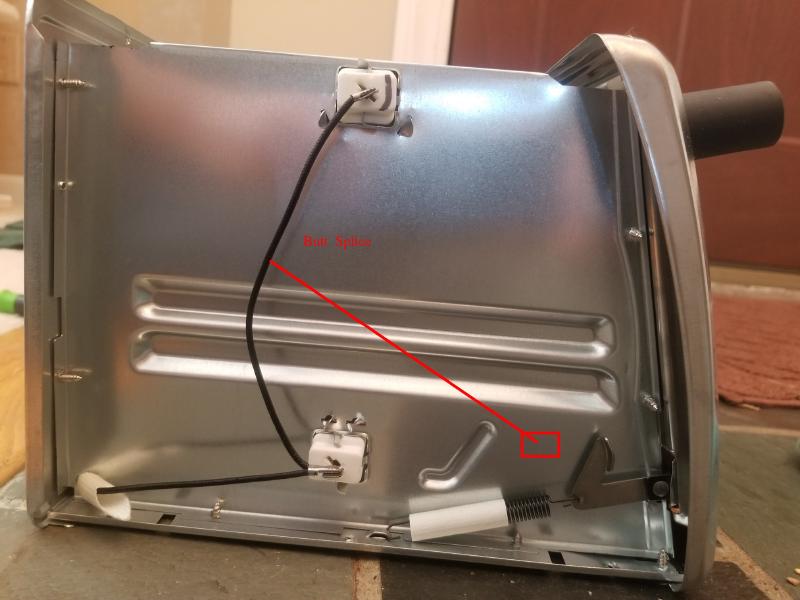
- Use the butt splice and connect the return wire of your element to the return wire of the bottom element. (This should be the same connection that you had before you removed the old element.
An optional upgrade #
The boost element that is included with the Controleo3 kit is a 350W resistive heating element. If you have bought a new donor oven, you now have an extra 650W heating element. Whizoo had recommended considering using the bottom element from the donor instead of the boost element included with the kit and this is what I ended up doing.
To do this, you will need to widen the 7/32" hole you drilled for the boost element in step #8 on the controller side into an approximately 13x20mm rectangle. You will also need to cut a similar (but slightly larger) sized hole on the non-controller side of the oven. On this side you’ll have to be careful not to interfere with the door opening spring.
On the controller side of the oven, the transplanted boost element can be wired into the same SSR as the bottom element.