Introduction #
There are many benefits to having a server in the home - it can act as a separate machine to back-up critical information to, serve data or applications to multiple users (in my case just my wife for now, but my kids will eventually come into the digital world), or just a Linux box that I can ssh into instead of using the Windows Subsystem for Linux (WSL). In this post I document the hardware & software that went into my initial build.
Hardware #
Although many places on the internet (like /r/homelab) will recommend you go with an old PC for your first server, I already have a full-depth 12U rack that houses my networking equipment. I set this up to future proof my home computing needs when I started with a Unifi Dream Machine Pro that would’ve required a shallower networking rack, but I instead opted for a StarTech.com 12U Open Frame Server Rack that can be purchased on Amazon.com. Given that I have 10U left of rack space (1U for UDM Pro, 1U for PoE switch), I wanted something that would fit in my rack and ideally could use old PC hardware that I’ve accumulated over years of PC builds and upgrades.
The table below gives an overview of the parts I used and what I paid for items that I acquired specifically for this build. For additional details on specific part selections, refer to the subsections further down this post.
| Function | Description | Source | Price |
|---|---|---|---|
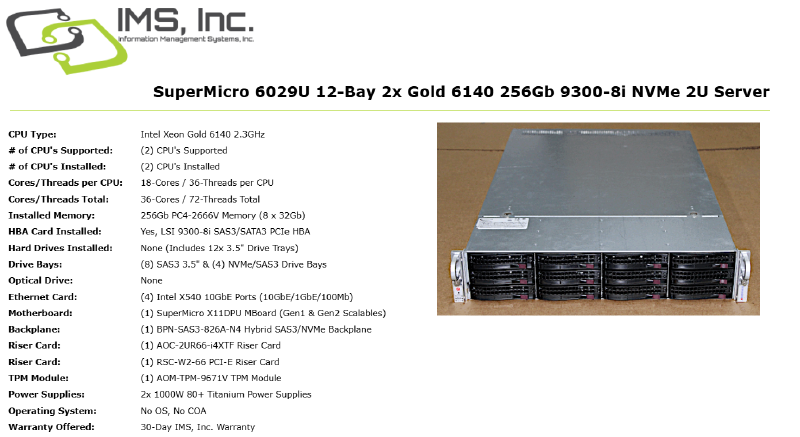
| Chassis, Power supplies, Backplane | Supermicro 2U Chassis with dual power supplies and SAS3 Backplane | eBay | $461.10 |
| Motherboard, CPU, RAM | Left over from a previous computer, ATX form factor | Re-use | $0 |
| CPU Cooler (Low Profile) | COOLSERVER R63 2U Server CPU Cooler | AliExpress | $22.66 |
| GPU | Gigabyte GeForce GT1030 | Amazon | $74.19 |
| HBA | LSI SAS3008 9300-8I IT-Mode | eBay | $75.00 |
| SAS Cables | HD Mini SAS SFF-8643 to Mini SAS SFF-8643 (2 pcs, 1 m length) | eBay | $23.98 |
| Front Panel adapter cable | Supermicro CBL-084L | eBay | $21.42 |
| Boot Drive | M.2 NVME to PCIe 3.0/4.0 x4 Adapter + Silicon Power 256 GB drive | Amazon | $36.02 |
| Storage Drives | 12x Seagate Ironwolf Pro 4TB Drives | Amazon | $1399.08 |
| Total | $2113.45 |
Comparing the total price to what is available on the market, there is no clear verdict on whether I saved any money with this build against an off the shelf option. Currently a Synology DS1621+ with 48TB of Seagate Ironwolf Pro drives is $1859.93 + tax online. My build has more memory, more cores, and a better GPU, but it lacks ECC. The synology option is also far lower power, but it is not in the form factor that I wanted. If I look for rack mounted solutions, I can find this QNAP TS-433eU but it has similar specifications at $1843 + tax.
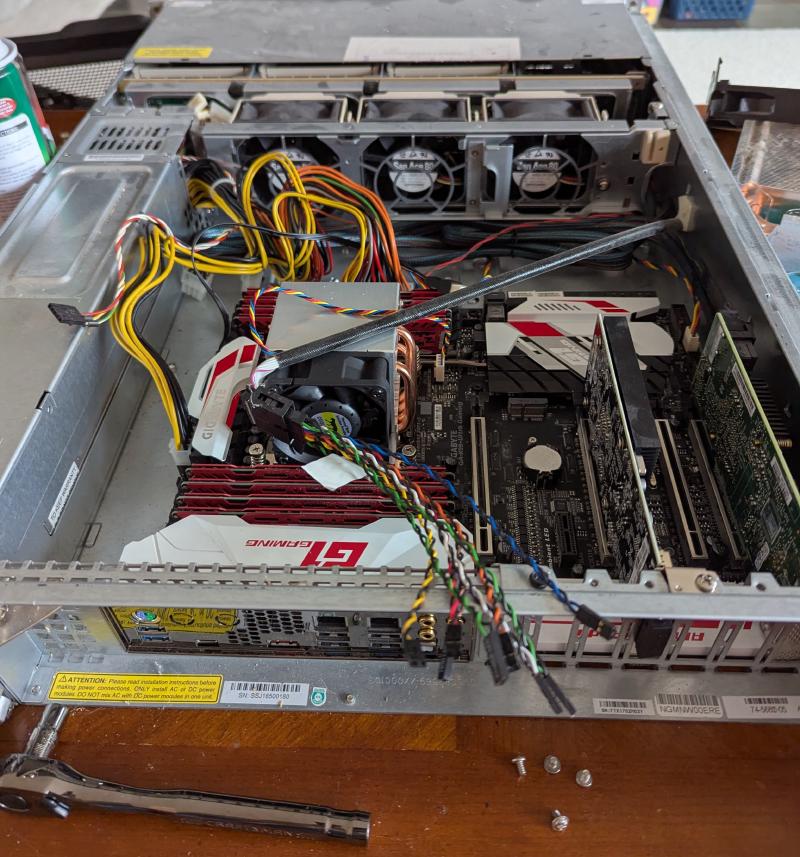
Chassis #
The chassis was the first part I acquired for this build back in 2022. Unfortunately, it also looks like it sent me down a suboptimal path relative to what is available in 2025. For about $45 more than what I spent on the chassis + HBA + cables + cooler, I could now get a chassis with far more cores and double the memory. This option wouldn’t have required that I start with old computer parts, which on their own cost far more than the $45 difference.
Motherboard / CPU / RAM #
The old PC parts that make up the heart of my server are:
- Gigabyte GA-X99-Ultra Gaming Motherboard
- Intel i7-6850K CPU
- Crucial Ballistix Sport LT 128 GB (8 x 16 GB) DDR4-2400 CL16 Memory (Non-ECC)
GPU #
The GT1030 GPU was chosen to support hardware transcoding in Emby. It had to be relatively cheap and fit within my 2U chassis.
HBA #
The HBA (host bus adapter) is the critical piece that is needed to interface my old computer parts with the SAS3 backplane. I chose this part to fit in an available PCIe slot, support the full 12 Gbps that is supported by the backplane, and connect disks as a bundle of disks (JBOD) instead of in some sort of RAID configuration. To meet these requirements I chose the LSI 9300-8I.
Software #
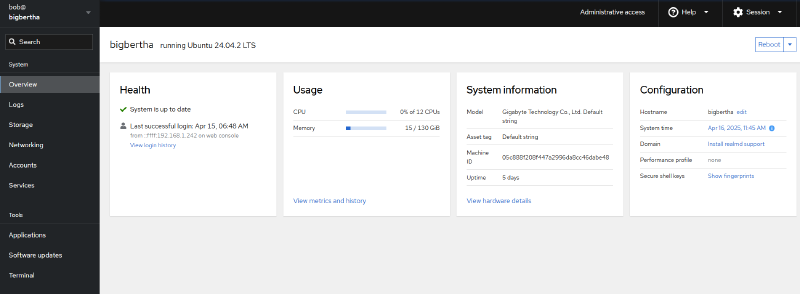
Ubuntu Server / Cockpit #
Since I’ve been an Ubuntu user on and off since around 2007, it is my go-to for free operating systems. I also considered TrueNAS Scale for this build but chose Ubuntu instead for flexibility.
To get a high-level view of my server, I am using cockpit. I really like this for looking up the status of various services while I work on the software configuration and installation, so I don’t have to clutter up my terminal history with systemd commands.
ZFS & Samba #
I set my 12 disks up as a raidz1 pool. This was actually really easy and fast to do, just requiring a single command:
sudo zpool create storage-pool raidz1 sda sdb sdc sdd sde sdf sdg sdh sdi sdj sdk sdlThe samba setup required a little more effort since my Windows 11 PCs did not like having guest access enabled for samba shares. There are solutions online for changing the policy in Windows, but I believe it is a better policy to just setup samba users with passwords to satisfy the policy. Overall, the Samba install and configure process went as follows.
- Install Samba with
sudo apt install samba - Create a share by editing the configuration file. Open in vim:
sudo vim /etc/samba/smb.confAnd then add a share as follows:
[media]
comment = Home media share
path = /storage-pool/Video
browsable = yes
guest ok = no
read only = no- Now that the share is setup, create a user that will access the share and set up their password.
sudo adduser --no-create-home --disabled-password --disabled-login sambabobEmby #
Installing Emby was a relatively painless process. I already had the backup and restore plugin used on my PC that was experimenting with an Emby install. I copied the backup files over, installed Emby via the package that I retrieved with wget, and restored on the server side. The paths to the Emby libraries had to be updated, but after these were scanned back in everything came back including watch history.
Gitea #
Installing Gitea was more complicated due to the configuration of the database backend. I initially started with mySQL but gave up after the configuration became confusing. Moving to postgreSQL was a bit more straightforward. The rough steps of getting gitea running were:
- Install git and postgreSQL with apt
- Create a postgres user and use it to create the gitea database and user
- In the /etc/postgresql/16/main/pg_hba.conf config file setup the local database access authentication with scram-sha-256
- Use wget to retrieve the binary from dl.gitea.com/gitea/1.23.6/gitea-1.23.6-linux-amd64. Move it to /usr/local/bin/gitea
- Use wget to get the example systemd service file from https://github.com/go-gitea/gitea/blob/release/v1.23/contrib/systemd/gitea.service
- Move the systemd service file to /etc/systemd/system and edit it to uncomment the postgresql service lines
- Go to the server on port 3000 with a web browser to complete the setup.
Conclusion & Future Plans #
Other than some frustrations with Samba and Gitea, this was a pretty straightforward project. I still have some work to do on the client side such as setting up backup synchronization (previously I used syncthing for this, but they discontinued their official Android app in December 2024) and identifying a git GUI client. I’m tentatively looking at resilio for sync and git cola for git, but those choices are still open to change.
I’m also looking at using HomeBox for cataloging expensive personal possessions for insurance reasons and potentially setting up some SRV records in the DNS settings of my Dream Machine Pro so I can have easier names for the various services that are running on my server.